Language
Avoiding Common Problems When Recording Vocals
Recording vocals are tough as it is, especially if you're a beginner. Even if you get everything else right and nail your performance, there are a few common problems that can be holding you back. Below, we take a look at all too common problems that can occur when recording vocals and how to avoid them.
 HEILSOUND Shock Mount for PR40 Type[/caption]
A common way of combating this problem is to employ a shock mount with your mic setup. Shockmounts work by forming acoustic isolation between the stand and the mic. You can easily test if you need a shock mount. Simply setup your mic like you normally would, make sure the gain is on high, and record-enable the track. Next, put on a pair of headphones, walk around and listen. If you can hear your footsteps or any other noise coming from the floor, employing a shock mount is a good idea.
A lot of mid to higher end condenser mics tend to ship with shock mounts already included. If yours didn’t but feel you would benefit from one, make sure you try searching for one made specifically for your mic as they are designed to work with a particular model. If one exists, it shouldn’t be too hard finding it. If you can’t find a shock mount for your mic, it might be a good idea to try a different mic altogether if floor noise is a big issue.
Having the right tools and knowing how to use them will go a long way in helping you get the best recording possible. If you need help finding a pop filter for your setup, a great mic with a shock mount included or another piece of gear, don't hesitate to chat with one of our PAL pros by using the Contact Us dialogue box below!
HEILSOUND Shock Mount for PR40 Type[/caption]
A common way of combating this problem is to employ a shock mount with your mic setup. Shockmounts work by forming acoustic isolation between the stand and the mic. You can easily test if you need a shock mount. Simply setup your mic like you normally would, make sure the gain is on high, and record-enable the track. Next, put on a pair of headphones, walk around and listen. If you can hear your footsteps or any other noise coming from the floor, employing a shock mount is a good idea.
A lot of mid to higher end condenser mics tend to ship with shock mounts already included. If yours didn’t but feel you would benefit from one, make sure you try searching for one made specifically for your mic as they are designed to work with a particular model. If one exists, it shouldn’t be too hard finding it. If you can’t find a shock mount for your mic, it might be a good idea to try a different mic altogether if floor noise is a big issue.
Having the right tools and knowing how to use them will go a long way in helping you get the best recording possible. If you need help finding a pop filter for your setup, a great mic with a shock mount included or another piece of gear, don't hesitate to chat with one of our PAL pros by using the Contact Us dialogue box below!
Popping
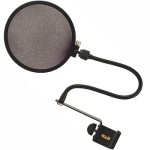
One of the most prevalent issues when recording vocals is the presence of “popping.” While it’s hard to notice during normal speech, our voice produces sharp blasts of air when pronouncing “P” and “B” sounds, otherwise known as “plosives.” On recordings, these plosives are extremely noticeable, creating a punchy low-frequency effect. You can feel just how strong plosives can be by trying it out on yourself. Place you hand directly in front of your mouth and say “Paper.” More than likely, you can feel the air hitting your hand. Now imagine your hand being the mic’s diaphragm. You get the idea. You can avoid having these blasts hit the diaphragm directly by singing at a slightly off-axis angle. While this should work to alleviate popping, there is an easier solution. Instead, most singers and engineers use a pop filter. This tool creates a barrier between you and the mic, acting like a net that reduces the air blast while letting other sound flow freely. They are also useful in ensuring that you never get too close to the mic and keep a stable distance.Sibilance
Along with Ps and Bs, pronouncing “S” and “F” sounds also create problems when recording as they tend to produce a high-frequency blast of air. We call this sibilance or the hissing effect. Much like plosives, it’s hard to notice the effects of sibilance during a normal conversation, but they stick out like a sore thumb during recordings. To hear it for yourself, grab a condenser mic if you have one (as they are more likely to be affected) and record yourself saying “I saw Susie sitting in a shoeshine shop,” or any other phrase with plenty of S of F sounds. Play it back and listen carefully to all of the S sounds. You should be able to hear a prominent hissing sound. To get rid of this annoying hiss, you can try to suppress it with software like multi-band compressors or de-essers, but the best practice is to avoid creating them altogether. Much like with plosives, singing into the mic at an off-axis angle will usually correct the problem. You can also try the sibilance pencil trick. Simply grab a pen or a pencil (or anything similar) and place if straight over the diaphragm of your mic, securing it with a rubber band. The pencil will keep the high-frequency blasts of air from hitting the diaphragm head on, instead diverting them off to the side.The Proximity Effect
The proximity effect is a change in the frequency response of a mic that produces a low-end boost, causing a singer's voice to sound fuller and deeper. The closer you are to a mic, the more prominent this effect will be. Not all mics are affected, though, but it does affect cardioid microphones which happen to be the standard polar pattern used on vocals. Experienced vocalists use the proximity effect as a creative tool with many benefits. It is also used on instrument recordings to create a warmer, earthier sound. But if you don’t know how to use it effectively, it can create a huge imbalance in your recording, with a low-end boost that seems to appear at random. You can find out more about using the proximity effect right here. The best way to avoid unintentionally triggering the proximity effect is by singing at a set distance without too much movement. As mentioned above, a pop filter is a good way to keep yourself from getting too close to the mic and keep a constant distance. You can also try using omnidirectional mics as they are not affected by the proximity effect due to the nature of their design.Floor Noise
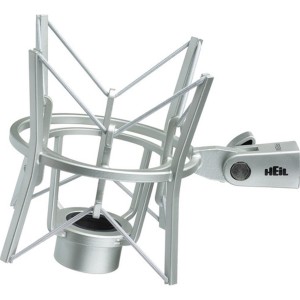
Many singers and musicians love tapping their feet to the beat of the song. While there’s nothing wrong with feeling the groove, the vibrations from their foot tapping on the floor can end up on the recording. And if your studio space happens to be located somewhere with especially creaky floors, there’s a chance that vibrations from even normal movements will end up on the tape as well. [caption id="attachment_4867" align="alignright" width="192"] HEILSOUND Shock Mount for PR40 Type[/caption]
A common way of combating this problem is to employ a shock mount with your mic setup. Shockmounts work by forming acoustic isolation between the stand and the mic. You can easily test if you need a shock mount. Simply setup your mic like you normally would, make sure the gain is on high, and record-enable the track. Next, put on a pair of headphones, walk around and listen. If you can hear your footsteps or any other noise coming from the floor, employing a shock mount is a good idea.
A lot of mid to higher end condenser mics tend to ship with shock mounts already included. If yours didn’t but feel you would benefit from one, make sure you try searching for one made specifically for your mic as they are designed to work with a particular model. If one exists, it shouldn’t be too hard finding it. If you can’t find a shock mount for your mic, it might be a good idea to try a different mic altogether if floor noise is a big issue.
Having the right tools and knowing how to use them will go a long way in helping you get the best recording possible. If you need help finding a pop filter for your setup, a great mic with a shock mount included or another piece of gear, don't hesitate to chat with one of our PAL pros by using the Contact Us dialogue box below!