Language
Truss Rod Adjustment for Fender Electrics
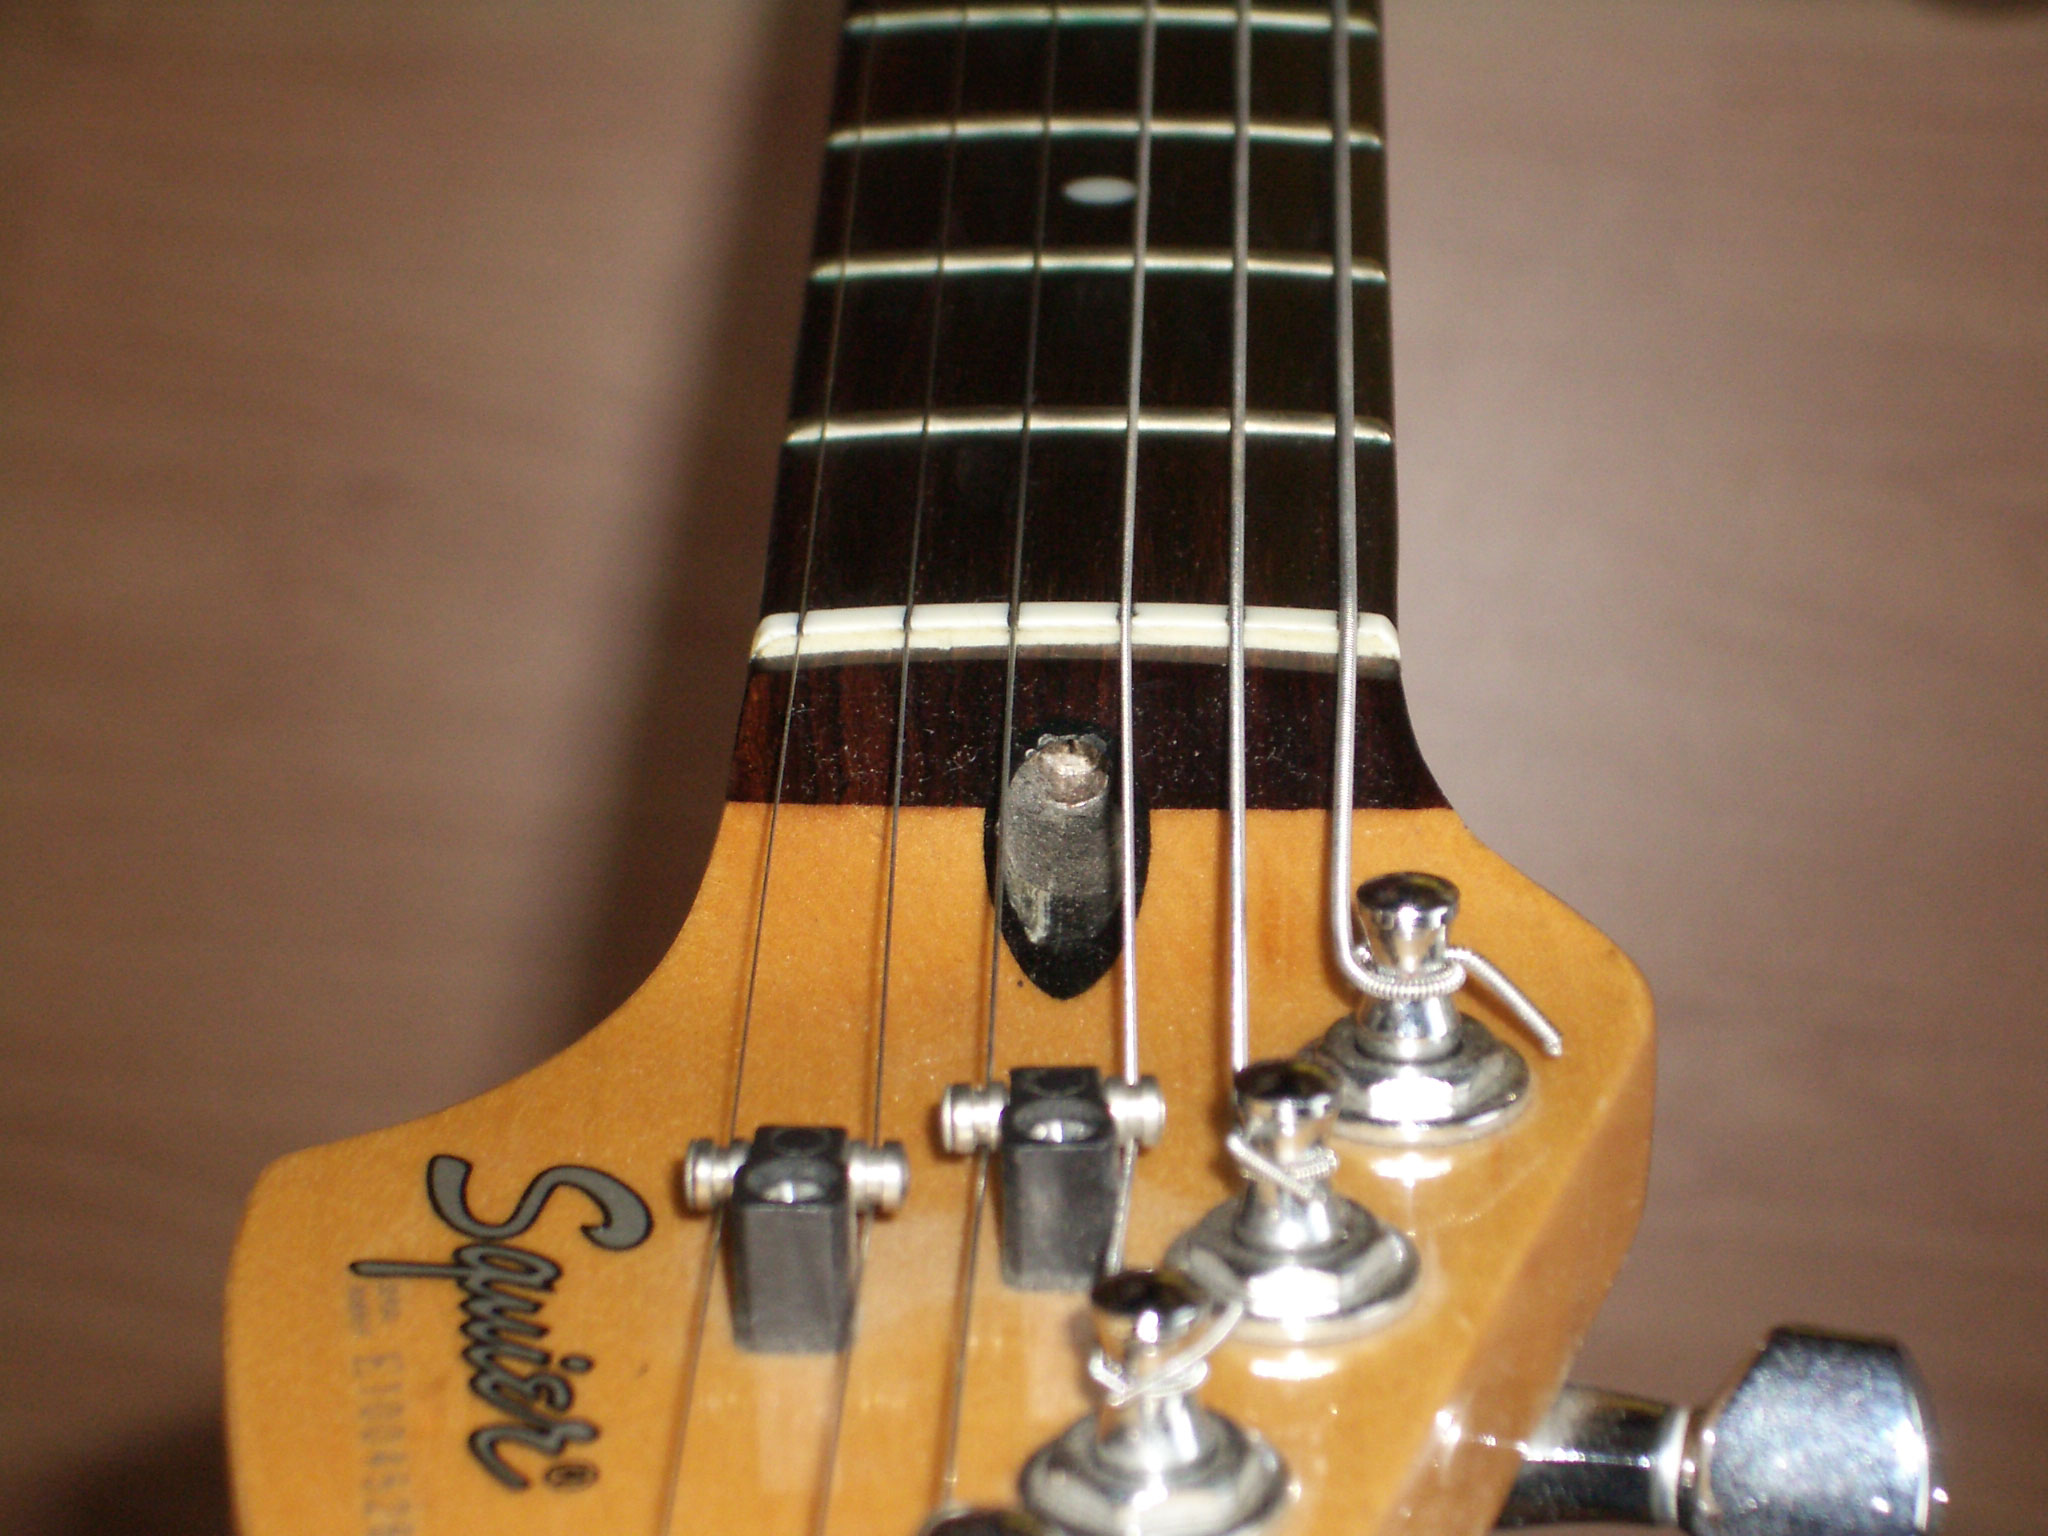
[caption id="attachment_2446" align="alignright" width="321"] Truss rod adjustment bolt visible from the side of headstock on this particular model.[/caption]
Having trouble with your guitar's action? Are your strings too far or too close to your frets? Sounds like its time for a truss rod adjustment! Let our good friends at Fender take you through the steps of truss rod adjustment and get the most out of your electric!
Excerpt from Fender Telecaster/Stratocaster Setup Guide:
There are two different styles of truss rod found on Fender instruments—"standard" and "bi-flex" truss rods.
Most Fender guitars and basses are equipped with a standard truss rod (of which there are in turn two types: one that adjusts at the neck heel and one that adjusts at the headstock; both operate on the same principle). The standard truss rod can counteract concave curvature in a neck that has too much relief, for example, by generating a force in the neck opposite to that caused by excessive string tension.
Fender also uses a unique bi-flex truss rod system on some instruments. Unlike standard truss rods, which can only correct a neck that is too concave (under-bowed), the bi-flex truss rod can compensate concave or convex (over-bowed) curvature by generating a correcting force in either direction as needed.
First, check your tuning. Affix a capo at the first fret and depress the sixth string at the last fret. With a feeler gauge, check the gap between the bottom of the string and the top of the 8th fret—see the spec chart below for the proper gap.
Adjustment at headstock (allen wrench): Sight down the edge of the fingerboard from behind the headstock, looking toward the body of the instrument. If the neck is too concave (action too high), turn the truss rod nut clockwise to remove excess relief. If the neck is too convex (strings too close to the fingerboard), turn the truss rod nut counter-clockwise to allow the string tension to pull more relief into the neck. Check your tuning, then re-check the gap with the feeler gauge and re-adjust as needed.
Adjustment at neck joint (phillips screwdriver): Sight down the edge of the fingerboard from behind the body, looking up toward the headstock of the instrument. If the neck is too concave (action too high), turn the truss rod nut clockwise to remove excess relief. If the neck is too convex (strings too close to the fingerboard), turn the truss rod nut counter-clockwise to allow the string tension to pull more relief into the neck. Check your tuning, then re-check the gap with the feeler gauge and re-adjust as needed.
Note: In either case, if you meet excessive resistance when adjusting the truss rod, if your instrument needs constant adjustment, if adjusting the truss rod has no effect on the neck, or if you're simply not comfortable making this type of adjustment yourself, take your instrument to your local Fender Authorized Dealer.
*Use the chart below to check the proper gap between the bottom of the string and the top of the 8th fret.
Neck Radius Relief
7.25" .012" (0.3 mm)
9.5" to 12" .010" (0.25 mm)
15" to 17" .008" (0.2 mm)
Truss rod adjustment bolt visible from the side of headstock on this particular model.[/caption]
Having trouble with your guitar's action? Are your strings too far or too close to your frets? Sounds like its time for a truss rod adjustment! Let our good friends at Fender take you through the steps of truss rod adjustment and get the most out of your electric!
Excerpt from Fender Telecaster/Stratocaster Setup Guide:
There are two different styles of truss rod found on Fender instruments—"standard" and "bi-flex" truss rods.
Most Fender guitars and basses are equipped with a standard truss rod (of which there are in turn two types: one that adjusts at the neck heel and one that adjusts at the headstock; both operate on the same principle). The standard truss rod can counteract concave curvature in a neck that has too much relief, for example, by generating a force in the neck opposite to that caused by excessive string tension.
Fender also uses a unique bi-flex truss rod system on some instruments. Unlike standard truss rods, which can only correct a neck that is too concave (under-bowed), the bi-flex truss rod can compensate concave or convex (over-bowed) curvature by generating a correcting force in either direction as needed.
First, check your tuning. Affix a capo at the first fret and depress the sixth string at the last fret. With a feeler gauge, check the gap between the bottom of the string and the top of the 8th fret—see the spec chart below for the proper gap.
Adjustment at headstock (allen wrench): Sight down the edge of the fingerboard from behind the headstock, looking toward the body of the instrument. If the neck is too concave (action too high), turn the truss rod nut clockwise to remove excess relief. If the neck is too convex (strings too close to the fingerboard), turn the truss rod nut counter-clockwise to allow the string tension to pull more relief into the neck. Check your tuning, then re-check the gap with the feeler gauge and re-adjust as needed.
Adjustment at neck joint (phillips screwdriver): Sight down the edge of the fingerboard from behind the body, looking up toward the headstock of the instrument. If the neck is too concave (action too high), turn the truss rod nut clockwise to remove excess relief. If the neck is too convex (strings too close to the fingerboard), turn the truss rod nut counter-clockwise to allow the string tension to pull more relief into the neck. Check your tuning, then re-check the gap with the feeler gauge and re-adjust as needed.
Note: In either case, if you meet excessive resistance when adjusting the truss rod, if your instrument needs constant adjustment, if adjusting the truss rod has no effect on the neck, or if you're simply not comfortable making this type of adjustment yourself, take your instrument to your local Fender Authorized Dealer.
*Use the chart below to check the proper gap between the bottom of the string and the top of the 8th fret.
Neck Radius Relief
7.25" .012" (0.3 mm)
9.5" to 12" .010" (0.25 mm)
15" to 17" .008" (0.2 mm)
 Truss rod adjustment bolt visible from the side of headstock on this particular model.[/caption]
Having trouble with your guitar's action? Are your strings too far or too close to your frets? Sounds like its time for a truss rod adjustment! Let our good friends at Fender take you through the steps of truss rod adjustment and get the most out of your electric!
Excerpt from Fender Telecaster/Stratocaster Setup Guide:
There are two different styles of truss rod found on Fender instruments—"standard" and "bi-flex" truss rods.
Most Fender guitars and basses are equipped with a standard truss rod (of which there are in turn two types: one that adjusts at the neck heel and one that adjusts at the headstock; both operate on the same principle). The standard truss rod can counteract concave curvature in a neck that has too much relief, for example, by generating a force in the neck opposite to that caused by excessive string tension.
Fender also uses a unique bi-flex truss rod system on some instruments. Unlike standard truss rods, which can only correct a neck that is too concave (under-bowed), the bi-flex truss rod can compensate concave or convex (over-bowed) curvature by generating a correcting force in either direction as needed.
First, check your tuning. Affix a capo at the first fret and depress the sixth string at the last fret. With a feeler gauge, check the gap between the bottom of the string and the top of the 8th fret—see the spec chart below for the proper gap.
Adjustment at headstock (allen wrench): Sight down the edge of the fingerboard from behind the headstock, looking toward the body of the instrument. If the neck is too concave (action too high), turn the truss rod nut clockwise to remove excess relief. If the neck is too convex (strings too close to the fingerboard), turn the truss rod nut counter-clockwise to allow the string tension to pull more relief into the neck. Check your tuning, then re-check the gap with the feeler gauge and re-adjust as needed.
Adjustment at neck joint (phillips screwdriver): Sight down the edge of the fingerboard from behind the body, looking up toward the headstock of the instrument. If the neck is too concave (action too high), turn the truss rod nut clockwise to remove excess relief. If the neck is too convex (strings too close to the fingerboard), turn the truss rod nut counter-clockwise to allow the string tension to pull more relief into the neck. Check your tuning, then re-check the gap with the feeler gauge and re-adjust as needed.
Note: In either case, if you meet excessive resistance when adjusting the truss rod, if your instrument needs constant adjustment, if adjusting the truss rod has no effect on the neck, or if you're simply not comfortable making this type of adjustment yourself, take your instrument to your local Fender Authorized Dealer.
*Use the chart below to check the proper gap between the bottom of the string and the top of the 8th fret.
Neck Radius Relief
7.25" .012" (0.3 mm)
9.5" to 12" .010" (0.25 mm)
15" to 17" .008" (0.2 mm)
Truss rod adjustment bolt visible from the side of headstock on this particular model.[/caption]
Having trouble with your guitar's action? Are your strings too far or too close to your frets? Sounds like its time for a truss rod adjustment! Let our good friends at Fender take you through the steps of truss rod adjustment and get the most out of your electric!
Excerpt from Fender Telecaster/Stratocaster Setup Guide:
There are two different styles of truss rod found on Fender instruments—"standard" and "bi-flex" truss rods.
Most Fender guitars and basses are equipped with a standard truss rod (of which there are in turn two types: one that adjusts at the neck heel and one that adjusts at the headstock; both operate on the same principle). The standard truss rod can counteract concave curvature in a neck that has too much relief, for example, by generating a force in the neck opposite to that caused by excessive string tension.
Fender also uses a unique bi-flex truss rod system on some instruments. Unlike standard truss rods, which can only correct a neck that is too concave (under-bowed), the bi-flex truss rod can compensate concave or convex (over-bowed) curvature by generating a correcting force in either direction as needed.
First, check your tuning. Affix a capo at the first fret and depress the sixth string at the last fret. With a feeler gauge, check the gap between the bottom of the string and the top of the 8th fret—see the spec chart below for the proper gap.
Adjustment at headstock (allen wrench): Sight down the edge of the fingerboard from behind the headstock, looking toward the body of the instrument. If the neck is too concave (action too high), turn the truss rod nut clockwise to remove excess relief. If the neck is too convex (strings too close to the fingerboard), turn the truss rod nut counter-clockwise to allow the string tension to pull more relief into the neck. Check your tuning, then re-check the gap with the feeler gauge and re-adjust as needed.
Adjustment at neck joint (phillips screwdriver): Sight down the edge of the fingerboard from behind the body, looking up toward the headstock of the instrument. If the neck is too concave (action too high), turn the truss rod nut clockwise to remove excess relief. If the neck is too convex (strings too close to the fingerboard), turn the truss rod nut counter-clockwise to allow the string tension to pull more relief into the neck. Check your tuning, then re-check the gap with the feeler gauge and re-adjust as needed.
Note: In either case, if you meet excessive resistance when adjusting the truss rod, if your instrument needs constant adjustment, if adjusting the truss rod has no effect on the neck, or if you're simply not comfortable making this type of adjustment yourself, take your instrument to your local Fender Authorized Dealer.
*Use the chart below to check the proper gap between the bottom of the string and the top of the 8th fret.
Neck Radius Relief
7.25" .012" (0.3 mm)
9.5" to 12" .010" (0.25 mm)
15" to 17" .008" (0.2 mm)