Language
Replacing The Output Jack On An Electric Guitar

One of the more common problems that most electric guitar players will eventually come across is a dead signal. Sometimes it might be the pickup wiring, the guitar’s circuitry or even something as simple as using a bad cable. And sometimes the problem can even stem from the output jack (sometimes wrongly referred to as an input jack), and if that’s the case then you’re in luck because rather than go out and get it repaired for about $40 (which is what I paid back when I was green behind the ears and the most I knew about wiring was connecting a Nintendo to a TV), you can fix it yourself for a fraction of the price – less than $5 if you already happen to have a soldering kit and common household tools. So, before you go and spend your hard-earned money, check out our tutorial on fixing an output jack. While you might not need the info this moment, the process is not all that hard and will save you plenty of time and worry when you find yourself stuck with a silent guitar. Besides, there’s no comparison to the satisfaction of fixing your axe with just your bare hands and a few tools.
 Remove the back plate on a Les Paul to expose the wiring cavity.[/caption]
Once you get the main wiring in sight, unscrew and remove the jack plate in order to free the output jack. Now that you have all of your wiring free, let’s make sure we’re going after the right problem. The most obvious thing to do is inspect all of the wiring to make sure nothing is loose or out of place. Those unfamiliar with a guitar’s wiring might have trouble making out just what the heck is going on in there, but a loose wire is essentially what you are looking for. If you see a loose wire coming from the output jack, then there’s your problem, obviously. Now if you see a loose wire coming from somewhere other than the output jack, the good news is you found your problem but you will have to refer to a wiring diagram of your particular guitar to know for sure where it should be re-soldered. In any case, once you figure out the problem, it’s time to get it fixed.
On to the Fixing
In either case, if the problem is a loose connection on any part of the circuitry or if you will need to replace the output jack entirely, you will need your soldering gun and solder. Lead-free solder is usually recommended but more so because of health concerns and environmental issues as opposed to performance. To be honest, it is much harder to work with lead-free solder as it requires higher temperatures to melt, high enough that it can cause damage to the connections, so I’d simply suggest regular less expensive solder. Either work in a well-ventilated area or wear a mask if lead is a concern.
[caption id="attachment_5807" align="alignright" width="218"]
Remove the back plate on a Les Paul to expose the wiring cavity.[/caption]
Once you get the main wiring in sight, unscrew and remove the jack plate in order to free the output jack. Now that you have all of your wiring free, let’s make sure we’re going after the right problem. The most obvious thing to do is inspect all of the wiring to make sure nothing is loose or out of place. Those unfamiliar with a guitar’s wiring might have trouble making out just what the heck is going on in there, but a loose wire is essentially what you are looking for. If you see a loose wire coming from the output jack, then there’s your problem, obviously. Now if you see a loose wire coming from somewhere other than the output jack, the good news is you found your problem but you will have to refer to a wiring diagram of your particular guitar to know for sure where it should be re-soldered. In any case, once you figure out the problem, it’s time to get it fixed.
On to the Fixing
In either case, if the problem is a loose connection on any part of the circuitry or if you will need to replace the output jack entirely, you will need your soldering gun and solder. Lead-free solder is usually recommended but more so because of health concerns and environmental issues as opposed to performance. To be honest, it is much harder to work with lead-free solder as it requires higher temperatures to melt, high enough that it can cause damage to the connections, so I’d simply suggest regular less expensive solder. Either work in a well-ventilated area or wear a mask if lead is a concern.
[caption id="attachment_5807" align="alignright" width="218"] Hot (left) and ground (right) wiring for a typical mono guitar output jack.[/caption]
Once you have your guitars circuitry in view and the output jack free from the jack plate, you can begin with the surgery. If the actual jack is fine and you simply need to reattach a wire, no need to cut the other wire off, just simply use your wire strippers to get enough exposed wire to be able to solder a solid connection on the jack. If you need to replace the entire jack, it’s a good idea to remove and solder one wire at a time so that you won’t get the connections mixed up and have to re-solder the whole thing later. The wires come in two different colors, usually black and red. The black is always the ground wire while the other is the hot output.
If the wire got detached from the output jack itself, you should be easily able to distinguish where it fell from (or refer to the picture above). If the loose wire came off from the other end, look for obvious signs of a soldered connection point. The hot wire is usually connected to the volume pot while the ground wire is connected to an "earth spot" (such as the bottom of the control pots). If you are not sure, we definitely recommend you look for your instrument's appropriate wiring diagram before you begin. You can start by searching through Seymour Duncan's wiring diagrams.
[caption id="attachment_5810" align="aligncenter" width="640"]
Hot (left) and ground (right) wiring for a typical mono guitar output jack.[/caption]
Once you have your guitars circuitry in view and the output jack free from the jack plate, you can begin with the surgery. If the actual jack is fine and you simply need to reattach a wire, no need to cut the other wire off, just simply use your wire strippers to get enough exposed wire to be able to solder a solid connection on the jack. If you need to replace the entire jack, it’s a good idea to remove and solder one wire at a time so that you won’t get the connections mixed up and have to re-solder the whole thing later. The wires come in two different colors, usually black and red. The black is always the ground wire while the other is the hot output.
If the wire got detached from the output jack itself, you should be easily able to distinguish where it fell from (or refer to the picture above). If the loose wire came off from the other end, look for obvious signs of a soldered connection point. The hot wire is usually connected to the volume pot while the ground wire is connected to an "earth spot" (such as the bottom of the control pots). If you are not sure, we definitely recommend you look for your instrument's appropriate wiring diagram before you begin. You can start by searching through Seymour Duncan's wiring diagrams.
[caption id="attachment_5810" align="aligncenter" width="640"]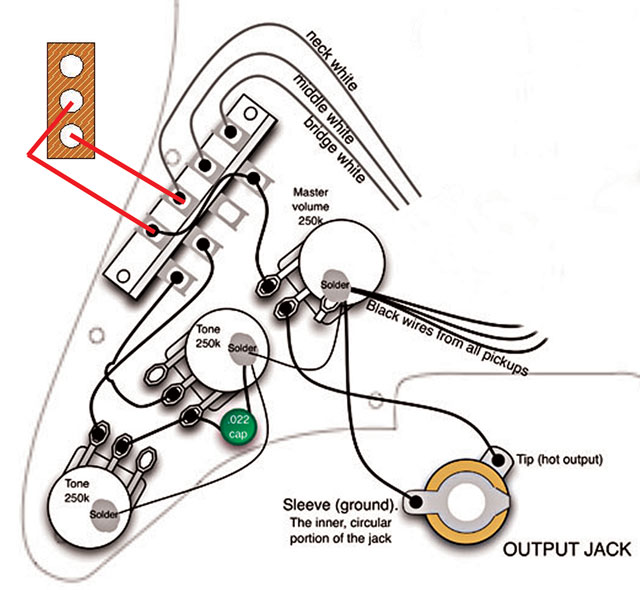 If you're not sure where a certain wire goes, refer to a wiring diagram (Strat diagram show above).[/caption]
In any case, before you go and connect the wire or wires to the output jack or pot, use your soldering gun to remove the old solder from the connections. After that, use your wire strippers to expose a small amount of copper from the end of the wire. Twist the ends of the wire so that they are not frayed in any way in order to get a nice solid connection. Alright, once this is done, place the exposed wire on the connection point and solder. If you are new to soldering, make sure the connection is held firmly in place so that it won’t move when left standing. It will need to cool and you won’t want to be holding the wire while this is going on. When the gun is placed on the solder, it will begin to melt but be careful not to heat it so much that it begins to drip excessively. You will only need a small amount of solder for optimum performance, but make sure it’s enough to be able to amply hold the connection. Once the connection is soldered firmly, let it sit for about 10-15 minutes so that the solder will cool.
Time to Test out the Job
Alright, now the moment of truth; before you go and put your guitar back together, test it out to make sure the connections are all working. You can connect the cable to the output jack while the jack is still free, but remember to hold down the base of the jack while you insert the cable so that you don’t accidently pull any of the wires loose. Hook the guitar to an amp and test it out. If you removed the strings because you were working on something like a Telecaster that needed the pickguard removed, connect your guitar to an amp but test the connection by placing the tip of your screwdriver on a pickup pole. If you hear a buzzing sound, you’re in luck because that means the connections worked.
All in all, not that hard of a job and trust me, you will eventually come across this problem and it will be much quicker and cheaper to fix it yourself rather than sending it to a shop for repair, not to mention the unequalled satisfaction of knowing that you yourself brought your axe back to life. The price of the repair alone should be more than enough to buy all the tools needed for the job and it is never a bad idea for a guitarist to have a soldering gun and solder lying around in case they need to make similar wiring patches or replace your pickups.
Editor's Note: This article was updated on 8/23/2016 for a more robust tutorial.
If you're not sure where a certain wire goes, refer to a wiring diagram (Strat diagram show above).[/caption]
In any case, before you go and connect the wire or wires to the output jack or pot, use your soldering gun to remove the old solder from the connections. After that, use your wire strippers to expose a small amount of copper from the end of the wire. Twist the ends of the wire so that they are not frayed in any way in order to get a nice solid connection. Alright, once this is done, place the exposed wire on the connection point and solder. If you are new to soldering, make sure the connection is held firmly in place so that it won’t move when left standing. It will need to cool and you won’t want to be holding the wire while this is going on. When the gun is placed on the solder, it will begin to melt but be careful not to heat it so much that it begins to drip excessively. You will only need a small amount of solder for optimum performance, but make sure it’s enough to be able to amply hold the connection. Once the connection is soldered firmly, let it sit for about 10-15 minutes so that the solder will cool.
Time to Test out the Job
Alright, now the moment of truth; before you go and put your guitar back together, test it out to make sure the connections are all working. You can connect the cable to the output jack while the jack is still free, but remember to hold down the base of the jack while you insert the cable so that you don’t accidently pull any of the wires loose. Hook the guitar to an amp and test it out. If you removed the strings because you were working on something like a Telecaster that needed the pickguard removed, connect your guitar to an amp but test the connection by placing the tip of your screwdriver on a pickup pole. If you hear a buzzing sound, you’re in luck because that means the connections worked.
All in all, not that hard of a job and trust me, you will eventually come across this problem and it will be much quicker and cheaper to fix it yourself rather than sending it to a shop for repair, not to mention the unequalled satisfaction of knowing that you yourself brought your axe back to life. The price of the repair alone should be more than enough to buy all the tools needed for the job and it is never a bad idea for a guitarist to have a soldering gun and solder lying around in case they need to make similar wiring patches or replace your pickups.
Editor's Note: This article was updated on 8/23/2016 for a more robust tutorial.
Fixing An Output Jack Video
Getting Started
These are the tools you will need to get the job done:- Philips screwdriver
- Soldering gun
- Solder
- New output jack (in case old one is broken or bent)
- Wire cutters (not especially necessary but will make things easier)
- Wire stripper (same as above)
Remove the back plate on a Les Paul to expose the wiring cavity.[/caption]
Once you get the main wiring in sight, unscrew and remove the jack plate in order to free the output jack. Now that you have all of your wiring free, let’s make sure we’re going after the right problem. The most obvious thing to do is inspect all of the wiring to make sure nothing is loose or out of place. Those unfamiliar with a guitar’s wiring might have trouble making out just what the heck is going on in there, but a loose wire is essentially what you are looking for. If you see a loose wire coming from the output jack, then there’s your problem, obviously. Now if you see a loose wire coming from somewhere other than the output jack, the good news is you found your problem but you will have to refer to a wiring diagram of your particular guitar to know for sure where it should be re-soldered. In any case, once you figure out the problem, it’s time to get it fixed.
On to the Fixing
In either case, if the problem is a loose connection on any part of the circuitry or if you will need to replace the output jack entirely, you will need your soldering gun and solder. Lead-free solder is usually recommended but more so because of health concerns and environmental issues as opposed to performance. To be honest, it is much harder to work with lead-free solder as it requires higher temperatures to melt, high enough that it can cause damage to the connections, so I’d simply suggest regular less expensive solder. Either work in a well-ventilated area or wear a mask if lead is a concern.
[caption id="attachment_5807" align="alignright" width="218"] Hot (left) and ground (right) wiring for a typical mono guitar output jack.[/caption]
Once you have your guitars circuitry in view and the output jack free from the jack plate, you can begin with the surgery. If the actual jack is fine and you simply need to reattach a wire, no need to cut the other wire off, just simply use your wire strippers to get enough exposed wire to be able to solder a solid connection on the jack. If you need to replace the entire jack, it’s a good idea to remove and solder one wire at a time so that you won’t get the connections mixed up and have to re-solder the whole thing later. The wires come in two different colors, usually black and red. The black is always the ground wire while the other is the hot output.
If the wire got detached from the output jack itself, you should be easily able to distinguish where it fell from (or refer to the picture above). If the loose wire came off from the other end, look for obvious signs of a soldered connection point. The hot wire is usually connected to the volume pot while the ground wire is connected to an "earth spot" (such as the bottom of the control pots). If you are not sure, we definitely recommend you look for your instrument's appropriate wiring diagram before you begin. You can start by searching through Seymour Duncan's wiring diagrams.
[caption id="attachment_5810" align="aligncenter" width="640"] If you're not sure where a certain wire goes, refer to a wiring diagram (Strat diagram show above).[/caption]
In any case, before you go and connect the wire or wires to the output jack or pot, use your soldering gun to remove the old solder from the connections. After that, use your wire strippers to expose a small amount of copper from the end of the wire. Twist the ends of the wire so that they are not frayed in any way in order to get a nice solid connection. Alright, once this is done, place the exposed wire on the connection point and solder. If you are new to soldering, make sure the connection is held firmly in place so that it won’t move when left standing. It will need to cool and you won’t want to be holding the wire while this is going on. When the gun is placed on the solder, it will begin to melt but be careful not to heat it so much that it begins to drip excessively. You will only need a small amount of solder for optimum performance, but make sure it’s enough to be able to amply hold the connection. Once the connection is soldered firmly, let it sit for about 10-15 minutes so that the solder will cool.
Time to Test out the Job
Alright, now the moment of truth; before you go and put your guitar back together, test it out to make sure the connections are all working. You can connect the cable to the output jack while the jack is still free, but remember to hold down the base of the jack while you insert the cable so that you don’t accidently pull any of the wires loose. Hook the guitar to an amp and test it out. If you removed the strings because you were working on something like a Telecaster that needed the pickguard removed, connect your guitar to an amp but test the connection by placing the tip of your screwdriver on a pickup pole. If you hear a buzzing sound, you’re in luck because that means the connections worked.
All in all, not that hard of a job and trust me, you will eventually come across this problem and it will be much quicker and cheaper to fix it yourself rather than sending it to a shop for repair, not to mention the unequalled satisfaction of knowing that you yourself brought your axe back to life. The price of the repair alone should be more than enough to buy all the tools needed for the job and it is never a bad idea for a guitarist to have a soldering gun and solder lying around in case they need to make similar wiring patches or replace your pickups.
Editor's Note: This article was updated on 8/23/2016 for a more robust tutorial.