Language
Truss Rod Adjustment: Fixing a Warped Guitar Neck
[caption id="attachment_1409" align="alignright" width="300"] In need of a new neck for your Tele or Strat? Check
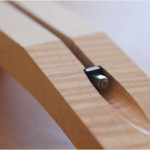
out great deals on Fender Guitar Necks![/caption] If your guitar’s fretboard just doesn't feel like it used to, it might be time to adjust that truss rod. Whether we like it or not, guitars sound best (arguably) when made of wood and although proper care and maintenance can ensure your guitar will look and sound amazing for years to come, the inherent properties of wood can take its toll on even the most well-kept guitars. Wood is a porous material that changes in size depending on humidity. When it rains it absorbs water, which is why doors get stuck during showers. When it’s hot or dry, they shrink as the water inside evaporates. The same thing is happening to your guitar neck… over and over and over again (unless you have it in a controlled environment with consistent humidity levels). Even though the changes in size are so small that we can’t really see it with our eyes, it’s happening, and over time, it can affect the neck of the guitar to the point where it is noticeably different – a warped neck. What is a Truss Rod? For those of you unfamiliar with the truss rod on a guitar, it’s a steel (or sometimes graphite) rod that goes through the neck in order to stay strong among all that string tension constantly pulling at it, but it’s not perfect. Even changing strings from a light to heavy gauge can sometimes be enough to start bending the neck enough so that your action rises to the point you will get a buzz from the higher frets. Temperature change can cause an even more serious beating to the neck – all that change in neck size, even small, will eventually cause problems with the rod’s optimal setting. As mentioned above, the good thing is that if caught early, a warped guitar neck can still be fixed, although there is a point of no return where you will have to get a new truss rod, even a new entire neck (or an entire new guitar in the case of acoustics) so it’s always a good idea to fix this problem as soon as you catch it. Truss rods work by adjusting the amount of tension that affects the guitar neck. When a truss rod is loosened, it moves closer to the body of the guitar which lessens the amount of resistance towards string tension, making the neck bend slightly outward. This is sometimes called a relief neck. When you tighten the trust rod, it moves closer towards the head of the guitar, increasing the resistance towards string tension, straightening the neck. Most manufactures will go for a neck with slight relief. Tightening the neck too much will give the neck a shape of a bow. This is never a good shape as this will cause notes to buzz when strung or even render them dead, but more on that in a second. For most players, you don’t want the neck to be perfectly straight. Slight relief of the trust rod ensures a low action on the guitar towards the middle of the neck while allowing the frets near the headstock to ring clearly. Most professional players usually don’t adjust the trust rod because of a warped neck but simply to adjust the neck shape and therefore the feel of the guitar although eventually, most guitars will need a slight truss rod adjustment from either normal wear of the neck from humidity or when switching to a thicker gauged string set. Detecting the Problem [caption id="attachment_1410" align="alignleft" width="300"] Cross-section of an electric guitar neck showing the position of the truss rod.[/caption]
Normally, a guitar’s truss rod is already adjusted to the proper tension when shipped from the factory. If you tend to use a heavier gauged string set than the one shipped with the guitar, you might need a very slight adjustment to compensate for the added tension, although it is best to leave it alone unless there are marked changes in performance. Another clear sign is a noticeable bend in the neck, so much so that the action towards the higher frets on the guitar are higher than normal which will either cause the strings hit on those frets to buzz or not ring at all. While the truss rod itself isn’t made to adjust the action, the by-product of shifting the truss rod will slightly shift the action (just FYI). If you notice any of these signs of warping, it is best to fix it as soon as you notice even the slightest amount of change since letting it get worse can render your guitar’s neck and truss rod irreparable.
As far as changing to heavier gauged strings go, the reason it is best to leave it alone and simply wait and see if there’s any change is because adjusting the truss rod is not as easy as it sounds and those who aren’t sure what they are doing can either strip the head of the bolt by using the wrong sized tool or even cause irreparable damage if tightened too much, something that isn’t worth the risk if all you need is a very tiny adjustment. With that being said, a warped guitar neck should DEFINITELY be looked at although newbies should get a music shop to adjust the truss rod, especially if it’s a guitar you don’t want to risk damaging. It should run you about $20 although some guitars require more work, so don’t be surprised if it might be a bit more, but definitely worth saving the life of your guitar.
Before You Start
Alright, so for those of you who feel as though have enough experience and know the risks (or simply have an old starter guitar they don’t mind messing with), it is not an all that difficult process, but you will need correct tool. Most guitars’ truss rod will require either an Allen wrench or a hex tool, although older Fender-style models with bolt-on necks (along with similar reissues) use Phillips head screwdrivers for adjustments and need the pickguard removed for the bolt to be visible. Newer Fender electric guitars do not need the pickguard removed and simply require a 1/8" (3 mm) Allen wrench. On set-neck electrics such as Gibson and Epiphone guitars the truss rod bolt is located in the back behind a cover plate near the nut connecting the neck to the guitar. These use either a 5/16” (8 mm) or a 1/4" (6 mm) hex tool. On acoustic guitars, the bolt will either be accessible through the sound hole at the bottom of the neck or on the headstock. Martin acoustic guitars use a 3/16" (5 mm) Allen wrench for adjustments.
Although these measurements are the most common, always double check to make sure your specific guitar’s truss rod bold measurement unless you feel like risking stripping the bolt head, making a slight adjustment more like a death sentence for the truss rod. Fender keeps a good record on their site and several other companies do as well. When in doubt, check the forums or ask a music shop. Although the tool needed can differ slightly from guitar to guitar, one thing is universal; counter-clockwise will decrease the tension while clockwise will increase the tension – righty tighty, lefty loosey!
Adjusting a Truss Rod
Now that you know where the truss rod bolt is at, what tool to use and what direction to turn, there are a few things you should look out for while you’re making adjustments to ensure you don’t overdo it and break your guitar. First, take a look at your guitars neck. Try and put it near a perfectly flat wall or surface. Usually, the neck might have too much relief and the neck will arch slightly in on itself or away from you. If the neck has too much tension and needs some relief, it will look like a bow, with the neck arching towards you (assuming you are wearing your guitar and not looking at it). If for some reason the neck is straight but you are having problems with the action still, then you’re in luck because it’s not the neck or truss rod at all and all you need is to adjust the bridge! Also, it should be said, if your neck is arched too much in the bow position there might be a chance it can’t be fixed so take it to a guitar tech to make sure. Most of the time, it’s in the relief position and simply needs some tightening.
Alright, assuming you’re neck needs some tightening (which is the almost always the case for warped guitars) and you have all the right tools ready, start by turning the bolt about an eighth of the way. If it turns pretty easily, then keep on adjusting in slight increments while checking the neck and frets. By the time the neck is straight, you should have felt plenty of tension while turning the bolt but not so much that you have to force it to turn. If at any time the guitar begins to creak or it the bolt requires a significant amount of force in order to turn, it is best to leave it alone. If by then the guitar neck is still slightly bent, it is best to take it to a guitar tech. Forcing the bolt on a truss rod will give you an unwanted pop which pretty much means you need an entirely new neck.
Although it is technically not hard at all to adjust the truss rod, it’s even easier to break your guitar, so unless you are absolutely confident in your ability, the amount charged for adjusting a truss rod is change compared to buying a new neck or guitar. Half the battle is realizing you need an adjustment, so if you can figure out that much, my job here is done and you might have spared yourself having to buy a new guitar!
Cross-section of an electric guitar neck showing the position of the truss rod.[/caption]
Normally, a guitar’s truss rod is already adjusted to the proper tension when shipped from the factory. If you tend to use a heavier gauged string set than the one shipped with the guitar, you might need a very slight adjustment to compensate for the added tension, although it is best to leave it alone unless there are marked changes in performance. Another clear sign is a noticeable bend in the neck, so much so that the action towards the higher frets on the guitar are higher than normal which will either cause the strings hit on those frets to buzz or not ring at all. While the truss rod itself isn’t made to adjust the action, the by-product of shifting the truss rod will slightly shift the action (just FYI). If you notice any of these signs of warping, it is best to fix it as soon as you notice even the slightest amount of change since letting it get worse can render your guitar’s neck and truss rod irreparable.
As far as changing to heavier gauged strings go, the reason it is best to leave it alone and simply wait and see if there’s any change is because adjusting the truss rod is not as easy as it sounds and those who aren’t sure what they are doing can either strip the head of the bolt by using the wrong sized tool or even cause irreparable damage if tightened too much, something that isn’t worth the risk if all you need is a very tiny adjustment. With that being said, a warped guitar neck should DEFINITELY be looked at although newbies should get a music shop to adjust the truss rod, especially if it’s a guitar you don’t want to risk damaging. It should run you about $20 although some guitars require more work, so don’t be surprised if it might be a bit more, but definitely worth saving the life of your guitar.
Before You Start
Alright, so for those of you who feel as though have enough experience and know the risks (or simply have an old starter guitar they don’t mind messing with), it is not an all that difficult process, but you will need correct tool. Most guitars’ truss rod will require either an Allen wrench or a hex tool, although older Fender-style models with bolt-on necks (along with similar reissues) use Phillips head screwdrivers for adjustments and need the pickguard removed for the bolt to be visible. Newer Fender electric guitars do not need the pickguard removed and simply require a 1/8" (3 mm) Allen wrench. On set-neck electrics such as Gibson and Epiphone guitars the truss rod bolt is located in the back behind a cover plate near the nut connecting the neck to the guitar. These use either a 5/16” (8 mm) or a 1/4" (6 mm) hex tool. On acoustic guitars, the bolt will either be accessible through the sound hole at the bottom of the neck or on the headstock. Martin acoustic guitars use a 3/16" (5 mm) Allen wrench for adjustments.
Although these measurements are the most common, always double check to make sure your specific guitar’s truss rod bold measurement unless you feel like risking stripping the bolt head, making a slight adjustment more like a death sentence for the truss rod. Fender keeps a good record on their site and several other companies do as well. When in doubt, check the forums or ask a music shop. Although the tool needed can differ slightly from guitar to guitar, one thing is universal; counter-clockwise will decrease the tension while clockwise will increase the tension – righty tighty, lefty loosey!
Adjusting a Truss Rod
Now that you know where the truss rod bolt is at, what tool to use and what direction to turn, there are a few things you should look out for while you’re making adjustments to ensure you don’t overdo it and break your guitar. First, take a look at your guitars neck. Try and put it near a perfectly flat wall or surface. Usually, the neck might have too much relief and the neck will arch slightly in on itself or away from you. If the neck has too much tension and needs some relief, it will look like a bow, with the neck arching towards you (assuming you are wearing your guitar and not looking at it). If for some reason the neck is straight but you are having problems with the action still, then you’re in luck because it’s not the neck or truss rod at all and all you need is to adjust the bridge! Also, it should be said, if your neck is arched too much in the bow position there might be a chance it can’t be fixed so take it to a guitar tech to make sure. Most of the time, it’s in the relief position and simply needs some tightening.
Alright, assuming you’re neck needs some tightening (which is the almost always the case for warped guitars) and you have all the right tools ready, start by turning the bolt about an eighth of the way. If it turns pretty easily, then keep on adjusting in slight increments while checking the neck and frets. By the time the neck is straight, you should have felt plenty of tension while turning the bolt but not so much that you have to force it to turn. If at any time the guitar begins to creak or it the bolt requires a significant amount of force in order to turn, it is best to leave it alone. If by then the guitar neck is still slightly bent, it is best to take it to a guitar tech. Forcing the bolt on a truss rod will give you an unwanted pop which pretty much means you need an entirely new neck.
Although it is technically not hard at all to adjust the truss rod, it’s even easier to break your guitar, so unless you are absolutely confident in your ability, the amount charged for adjusting a truss rod is change compared to buying a new neck or guitar. Half the battle is realizing you need an adjustment, so if you can figure out that much, my job here is done and you might have spared yourself having to buy a new guitar!
In need of a new neck for your Tele or Strat? Checkout great deals on Fender Guitar Necks![/caption] If your guitar’s fretboard just doesn't feel like it used to, it might be time to adjust that truss rod. Whether we like it or not, guitars sound best (arguably) when made of wood and although proper care and maintenance can ensure your guitar will look and sound amazing for years to come, the inherent properties of wood can take its toll on even the most well-kept guitars. Wood is a porous material that changes in size depending on humidity. When it rains it absorbs water, which is why doors get stuck during showers. When it’s hot or dry, they shrink as the water inside evaporates. The same thing is happening to your guitar neck… over and over and over again (unless you have it in a controlled environment with consistent humidity levels). Even though the changes in size are so small that we can’t really see it with our eyes, it’s happening, and over time, it can affect the neck of the guitar to the point where it is noticeably different – a warped neck. What is a Truss Rod? For those of you unfamiliar with the truss rod on a guitar, it’s a steel (or sometimes graphite) rod that goes through the neck in order to stay strong among all that string tension constantly pulling at it, but it’s not perfect. Even changing strings from a light to heavy gauge can sometimes be enough to start bending the neck enough so that your action rises to the point you will get a buzz from the higher frets. Temperature change can cause an even more serious beating to the neck – all that change in neck size, even small, will eventually cause problems with the rod’s optimal setting. As mentioned above, the good thing is that if caught early, a warped guitar neck can still be fixed, although there is a point of no return where you will have to get a new truss rod, even a new entire neck (or an entire new guitar in the case of acoustics) so it’s always a good idea to fix this problem as soon as you catch it. Truss rods work by adjusting the amount of tension that affects the guitar neck. When a truss rod is loosened, it moves closer to the body of the guitar which lessens the amount of resistance towards string tension, making the neck bend slightly outward. This is sometimes called a relief neck. When you tighten the trust rod, it moves closer towards the head of the guitar, increasing the resistance towards string tension, straightening the neck. Most manufactures will go for a neck with slight relief. Tightening the neck too much will give the neck a shape of a bow. This is never a good shape as this will cause notes to buzz when strung or even render them dead, but more on that in a second. For most players, you don’t want the neck to be perfectly straight. Slight relief of the trust rod ensures a low action on the guitar towards the middle of the neck while allowing the frets near the headstock to ring clearly. Most professional players usually don’t adjust the trust rod because of a warped neck but simply to adjust the neck shape and therefore the feel of the guitar although eventually, most guitars will need a slight truss rod adjustment from either normal wear of the neck from humidity or when switching to a thicker gauged string set. Detecting the Problem [caption id="attachment_1410" align="alignleft" width="300"]
Cross-section of an electric guitar neck showing the position of the truss rod.[/caption]
Normally, a guitar’s truss rod is already adjusted to the proper tension when shipped from the factory. If you tend to use a heavier gauged string set than the one shipped with the guitar, you might need a very slight adjustment to compensate for the added tension, although it is best to leave it alone unless there are marked changes in performance. Another clear sign is a noticeable bend in the neck, so much so that the action towards the higher frets on the guitar are higher than normal which will either cause the strings hit on those frets to buzz or not ring at all. While the truss rod itself isn’t made to adjust the action, the by-product of shifting the truss rod will slightly shift the action (just FYI). If you notice any of these signs of warping, it is best to fix it as soon as you notice even the slightest amount of change since letting it get worse can render your guitar’s neck and truss rod irreparable.
As far as changing to heavier gauged strings go, the reason it is best to leave it alone and simply wait and see if there’s any change is because adjusting the truss rod is not as easy as it sounds and those who aren’t sure what they are doing can either strip the head of the bolt by using the wrong sized tool or even cause irreparable damage if tightened too much, something that isn’t worth the risk if all you need is a very tiny adjustment. With that being said, a warped guitar neck should DEFINITELY be looked at although newbies should get a music shop to adjust the truss rod, especially if it’s a guitar you don’t want to risk damaging. It should run you about $20 although some guitars require more work, so don’t be surprised if it might be a bit more, but definitely worth saving the life of your guitar.
Before You Start
Alright, so for those of you who feel as though have enough experience and know the risks (or simply have an old starter guitar they don’t mind messing with), it is not an all that difficult process, but you will need correct tool. Most guitars’ truss rod will require either an Allen wrench or a hex tool, although older Fender-style models with bolt-on necks (along with similar reissues) use Phillips head screwdrivers for adjustments and need the pickguard removed for the bolt to be visible. Newer Fender electric guitars do not need the pickguard removed and simply require a 1/8" (3 mm) Allen wrench. On set-neck electrics such as Gibson and Epiphone guitars the truss rod bolt is located in the back behind a cover plate near the nut connecting the neck to the guitar. These use either a 5/16” (8 mm) or a 1/4" (6 mm) hex tool. On acoustic guitars, the bolt will either be accessible through the sound hole at the bottom of the neck or on the headstock. Martin acoustic guitars use a 3/16" (5 mm) Allen wrench for adjustments.
Although these measurements are the most common, always double check to make sure your specific guitar’s truss rod bold measurement unless you feel like risking stripping the bolt head, making a slight adjustment more like a death sentence for the truss rod. Fender keeps a good record on their site and several other companies do as well. When in doubt, check the forums or ask a music shop. Although the tool needed can differ slightly from guitar to guitar, one thing is universal; counter-clockwise will decrease the tension while clockwise will increase the tension – righty tighty, lefty loosey!
Adjusting a Truss Rod
Now that you know where the truss rod bolt is at, what tool to use and what direction to turn, there are a few things you should look out for while you’re making adjustments to ensure you don’t overdo it and break your guitar. First, take a look at your guitars neck. Try and put it near a perfectly flat wall or surface. Usually, the neck might have too much relief and the neck will arch slightly in on itself or away from you. If the neck has too much tension and needs some relief, it will look like a bow, with the neck arching towards you (assuming you are wearing your guitar and not looking at it). If for some reason the neck is straight but you are having problems with the action still, then you’re in luck because it’s not the neck or truss rod at all and all you need is to adjust the bridge! Also, it should be said, if your neck is arched too much in the bow position there might be a chance it can’t be fixed so take it to a guitar tech to make sure. Most of the time, it’s in the relief position and simply needs some tightening.
Alright, assuming you’re neck needs some tightening (which is the almost always the case for warped guitars) and you have all the right tools ready, start by turning the bolt about an eighth of the way. If it turns pretty easily, then keep on adjusting in slight increments while checking the neck and frets. By the time the neck is straight, you should have felt plenty of tension while turning the bolt but not so much that you have to force it to turn. If at any time the guitar begins to creak or it the bolt requires a significant amount of force in order to turn, it is best to leave it alone. If by then the guitar neck is still slightly bent, it is best to take it to a guitar tech. Forcing the bolt on a truss rod will give you an unwanted pop which pretty much means you need an entirely new neck.
Although it is technically not hard at all to adjust the truss rod, it’s even easier to break your guitar, so unless you are absolutely confident in your ability, the amount charged for adjusting a truss rod is change compared to buying a new neck or guitar. Half the battle is realizing you need an adjustment, so if you can figure out that much, my job here is done and you might have spared yourself having to buy a new guitar!